Timing Cover and Water Pump Installation
(applicable to 277, 301, 303, 313, 318, 326, 390, 402 and LA 273, 318, 340, 360 engines)
Introduction
Mopar small blocks including poly A-blocks and LA engines use a two-piece timing-set cover and water pump that can present coolant system issues for those unfamiliar with the installation process. The issue often stems from the installer neglecting to properly seal specific bolts whose threaded bosses are machined through to coolant passages in the block. I have detailed the installation process to ensure the process goes smoothly.
Three Types of Timing-set Covers
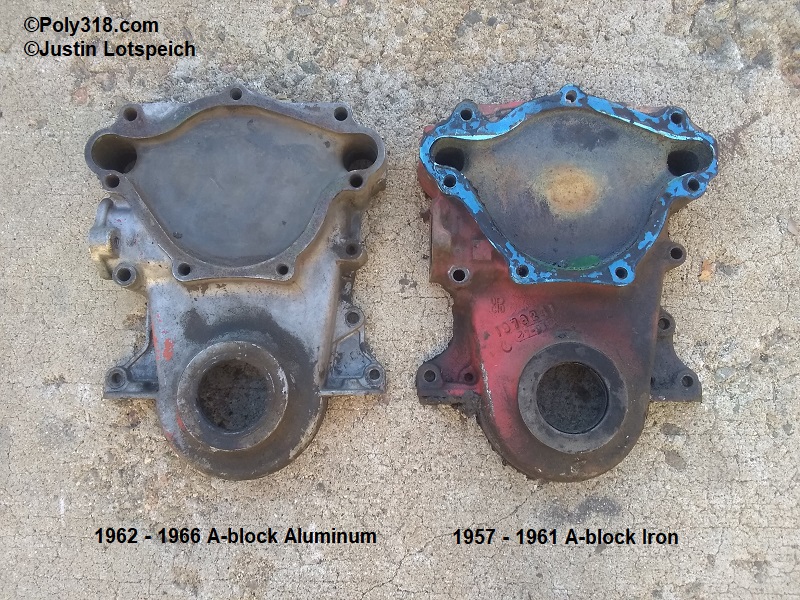
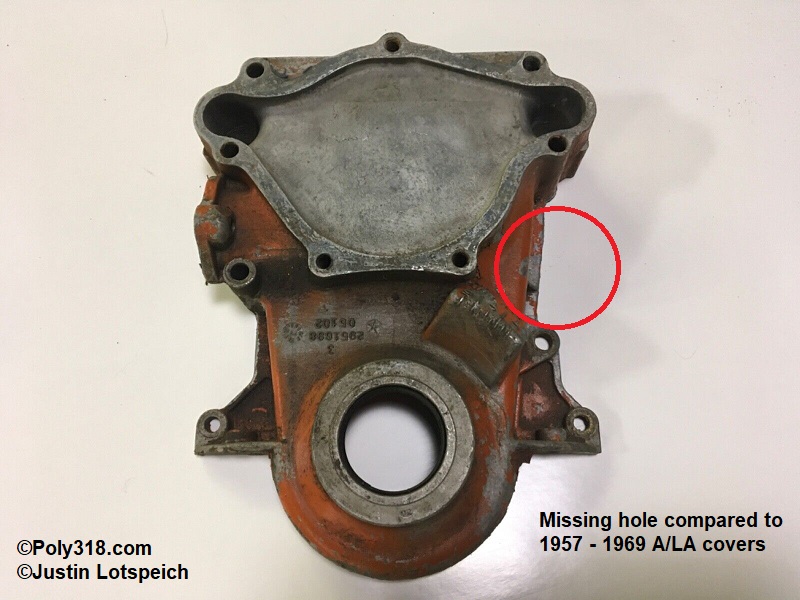
Before cleaning anything, I verify the type of timing cover I have and its condition. Early A-blocks used a cast-iron timing cover that are difficult to corrode, whereas later versions used and aluminum cover that are prone to corrosion bad enough to eat holes through the cover allowing coolant to enter the crankcase. LA aluminum covers can be used on A-blocks, but it is important to know that A-block iron and aluminum covers have one additional bolt than LA covers (Figures 1 – 2).
Using an LA Timing Cover
If I’m using an A-block cover with the additional hole, I can move onto the cleaning step in the next section below. If I’m using an LA cover without the additional hole on an A-block, which is common for people replacing badly corroded original timing covers, I need to plug the extra threaded boss in the block because it goes through into coolant. If this boss isn’t plugged, coolant will poor out of the block. An extra-long 3/8″-16 Allen setscrew (not a tapered pipe plug) can be used, or I cut off a grade 2 bolt’s threads 1/2″ long and use a cuttoff wheel or hacksaw to cut a slot into the head. I clean out the block threaded boss with brake cleaner and blow it out dry with compressed air. I coat the plug liberally with Permatex 80003, tighten it until it seats snugly on the bottom of the boss, and wipe off any protruding sealant. At 1/2″, the plug should be down in the hole about 1/8″.
Cleaning and Preparation
- If I’m replacing the cover on a running, assembled engine versus during rebuild, I drape rags around the timing set and push rags into the front of the lifter valley drain-back holes and oil pan to keep gasket debris off the timing set and out of the lifter valley and oil pan.
- I use a sharp gasket scraper to remove any loose gasket and sealant from the block, timing cover, and water pump. For the block and iron timing covers, I use a 3″ mild abrasive pad with extremely light touch on a pneumatic angle grinder to make quick work of cleaning, but abrasive pads will take off iron if using excessive force or staying in the same place. Do not use abrasive pads on aluminum since they will remove aluminum and create an uneven sealing surface. For aluminum covers and pumps, I use the scraper and am careful to not gouge the aluminum.
- After the surfaces are clean, I gently use compressed air to clean off the surfaces and the rags I placed to stop debris from entering the engine. I remove any protective rags and inspect for and remove any debris from inside the engine.
- I dip a bit of rag into lacquer thinner and wipe the gasket surfaces to clean off all oil residue.
Installation
I don’t like using RTV silicone whenever possible because it is a pain to clean off for future work and there are better sealants for the timing cover and water pump. For the timing cover and pump fiber gaskets, a gasket sealant like Permatex 80019 or Gasgacinch works very well.
- I place the cover and pump gaskets on a piece of cardboard and brush the sealant onto one side of the gaskets and let them tack up until the liquid doesn’t transfer to my finger (about five minutes depending on ambient temperature and humidity).
- I press the sealed side of the timing-cover gasket onto the cover and the pump gasket onto the pump, brush the sealant onto the other dry side of the gaskets, and let the sealant tack up.
- While I’m waiting for the sealant to tack up, I install the washers on the bolts and apply a liberal bead of Permatex 80003 sealant to the threads I note in Figure 3 and smooth the sealant into the threads. The bolts that go through to coolant can and often will leak if left unsealed. The two top pump bolts can either be blind threaded bosses or can go through into the lifter valley and don’t require sealant.
- After the sealant has tacked up, I carefully install the cover onto the block using a couple bolts and the bottom block alignment pegs to help keep the gasket aligned. I tighten the bolts finger tight at this point.
- I install the pump onto the cover remembering to include the ignition timing pointer tab, if applicable, and tighten the bolts finger tight.
- Using a ratchet, I torque all the bolts in a three-step sequence in an “X” pattern until I feel the gaskets seat, which is around 35 ft.lbs. for iron covers and 30 ft.lbs. for aluminum. The four pump bolts may require a fourth sequence since they crush an additional gasket. Note that one bolt behind the pump inlet barb can’t be reached with a socket and requires a wrench.
- Since the gaskets and bolt sealant will be under both temperature and pressure, I allow the sealants to cure for 24 hours (48 in temperatures under 60°F) before filling the coolant and firing the engine. Leaving the coolant passages empty will introduce more oxygen to help cure the sealants quicker.
For details on how I fill the cooling system, see the later section (around step 27) of my technical article on installing the intake manifold.
FIGURES