Poly A-block Torque Specifications
I have compiled these poly 277, 301, 303, 313, 318, and 326 torque specifications from multiple factory manuals and fastener data and added process notes from my experience and industry standards. See the service manual page for digital service manuals I provide for free download. Thread locker and sealants can be found at local and online retailers such as Napa Auto, Home Depot, Summit Racing, and others.
Fastener Alloy and Lubrication
The following torque specs assume a grade-5 or higher alloy and are for wet fasteners lightly oiled with clean motor oil (or fastener assembly lubricant), which is how the factory calculated the specs and how A318 engines were assembled at the engine plants. The oil should be applied to where the threads are just coated but not dripping. For example, three drops on main cap bolts, two on rod bolts, etc. Oil should also be applied on the underside of the fastener or on the component face where the fastener and surface touch, such as on the flat of the main cap next to the bolt hole. If using thread-locker on the select few fasteners on an engine where it is appropriate (e.g. oil pump cover bolts, windage tray, camshaft bolt, etc.), the threads should be clean of all oil. The thread-locker substitutes the oil and uses the same torque spec. Note that using the following torque specs with dry fasteners will result in under-torqued components.
| Component | Lb.Ft. | Lb.In. | Notes |
|---|---|---|---|
| Accessories Brackets Bolt/Nut, 3/8″ | 30 | ||
| Accessories Brackets Bolt/Nut, 5/16″ | 25 | ||
| Alternator/Generator Adjusting Bolt | 200 | Use the longest bolt possible for maximum thread coverage. Apply antiseize to this bolt to stop corrosion with the aluminum alternator housing. Warning: Don’t over-torque the fastener since the housing will easily strip. | |
| Bellhousing to Block Bolt | 50 | WARNING: For automatics, ensure torque converter snout notches are fully aligned and engaged with the transmission pump tangs before tightening bellhousing bolts. Failure to do so can result in broken bellhousing ears and/or flexplate. | |
| Camshaft Sprocket Bolt | 35 | I use red thread-locker. | |
| Camshaft Thrust Plate Bolt | 180 | I use blue thread-locker. | |
| Carburetor Base to Intake Nut | Tighten until gasket seats, 60 – 80. | WARNING: Tighten evenly in an “X” pattern in three steps until the gasket seats. Overtightening can warp the baseplate/air horn and cause vacuum/fuel leaks. | |
| Carburetor Studs into Manifold | 25 | I use red thread-locker. | |
| Connecting Rod Nut | 45 | Tighten back and forth in three steps of 25, 35, 45 | |
| Coolant Plug or Nipple 1/2″ NPT | 30 | Seal with PTFE tape or Rectorseal 23631 T Plus 2. | |
| Coolant Plug or Nipple 1/4″ NPT | 16 | Seal with PTFE tape or Rectorseal 23631 T Plus 2. | |
| Coolant Plug or Nipple 3/4″ NPT | 54 | Seal with PTFE tape or Rectorseal 23631 T Plus 2. | |
| Coolant Sensor or Plug 1/8″ NPT | 7 | Seal with PTFE tape or Rectorseal 23631 T Plus 2. | |
| Crankshaft Harmonic Damper Bolt | 135 | ||
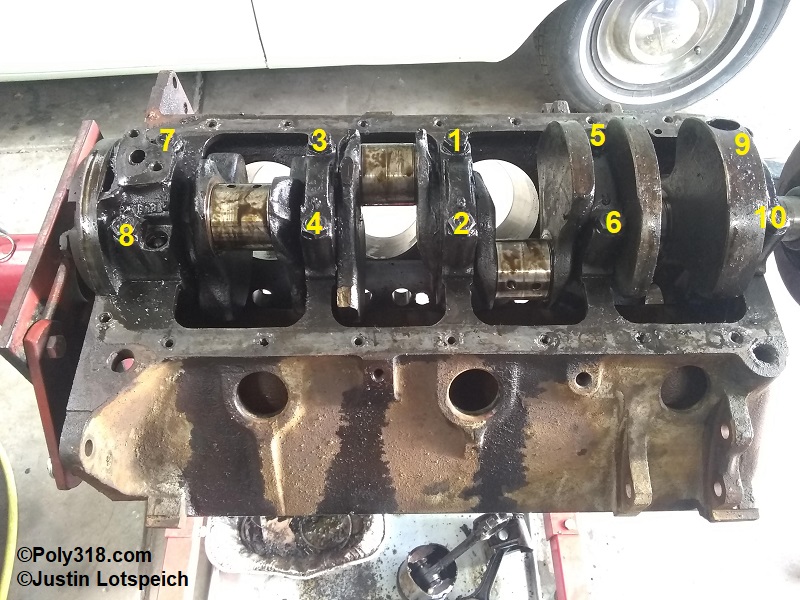
| Crankshaft Main Cap Bolt | 85 | Follow Figure 1 sequence. Tighten evenly in three steps of 30, 60, 85. | |
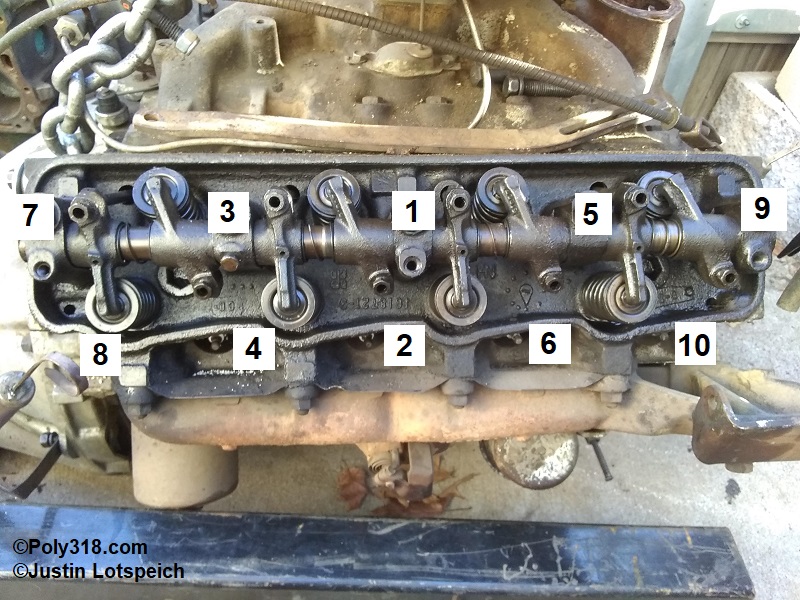
| Cylinder Head Bolt | 85 | Follow Figure 2 sequence. Almost always, no sealant is needed on the bolts because they are blind bosses and do not go into coolant; however, check the bosses with a flashlight to confirm and seal with Rectorseal 23631 T Plus 2 or equivalent if you find a boss that goes through to coolant. Tighten evenly in three steps of 30 ft., 60 ft., 85 ft. |
|
| Distributor Hold-down Bolt, Iron Intake | 180 | Apply antiseize to this bolt to stop corrosion and make adjustments easier. | |
| Exhaust Collector Flange Nut/Bolt, 7/16″-20 | 40 | Apply antiseize to this bolt to stop corrosion. | |
| Exhaust Manifolds Stud into Head | 30 | Seal lower row with Rectorseal 23631 T Plus 2 or equivalent approved for steam and high-temp since they go into coolant. The upper row are blind holes and don’t require sealing. See the manifold installation tech article. | |
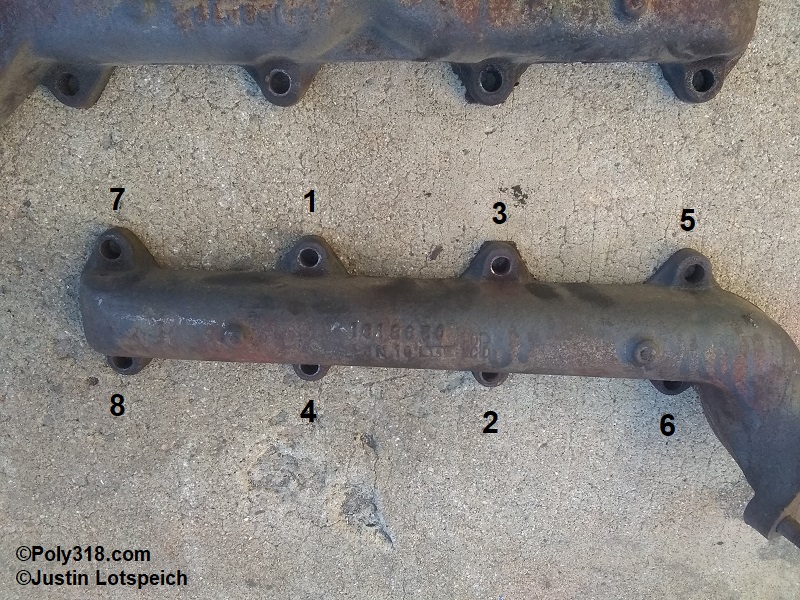
| Exhaust Manifolds to Head Nut/Bolt | 25 | Follow Figure 3 sequence. Tighten in three steps. Recheck after multiple heat cycles. See my technical article on installation. | |
| Flexplate to Converter Bolt, 5/16″ | 25 | I use blue thread-locker. | |
| Flexplate to Converter Bolt, 7/16″ | 65 | I use blue thread-locker. | |
| Flexplate/Flywheel to Crankshaft Bolt | 55 | I use red thread-locker. | |
| Fuel Pump Bolt | 30 | Use Rectorseal 23631 T Plus 2 or equivalent on the threads of the bolt that goes through to the interior to stop oil seepage. | |
| Harmonic Damper or Hubbed Pulley Bolt | 135 | ||
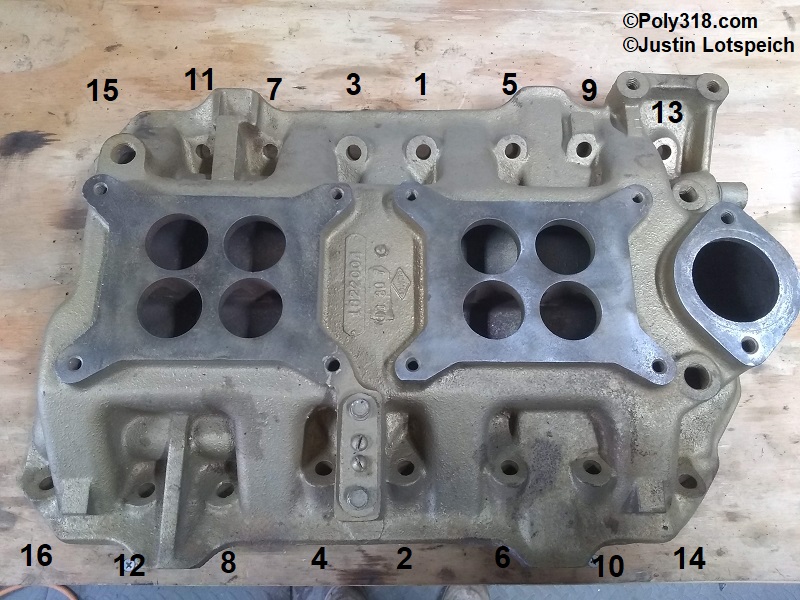
| Intake Manifold Bolt | 30 | Follow Figure 4 sequence. Tighten in three steps. Recheck after multiple heat cycles. Bolts that go through to the valley may be sealed with Rectorseal 23631 T Plus 2 or equivalent to stop oil seepage. See my technical article on installation.See the manifold installation tech article. | |
| Motor Mounts to Block, 7/16″ Bolt | 55 | This spec is for dry fasteners. See Figure 5 for proper motor mount positioning. | |
| Motor Mounts to Chassis, 1/2″ Stud (1956 – 1972 Style) | 75 | This spec is for dry fasteners. | |
| Motor Mounts to Chassis, 5/8″ Bolt (1973 on Style) | 75 | This spec is for dry fasteners. | |
| Oil Drain Plug | 20 | ||
| Oil Filter Bolt/Stud (spin-on) | 30 | I use red-threadlocker | |
| Oil Filter Bolt (canister) | 30 | ||
| Oil Gallery Plug 1/2″ NPT | 30 | Seal with Permatex 80003 | |
| Oil Gallery Plug 3/4″ NPT | 54 | Seal with Permatex 80003 | |
| Oil Pan Bolt | Tighten until gasket seats. 180 max | Work evenly from center out similar to Figure 4. Tighten in three steps. Warning: Over-torquing will warp the pan and result in leaks. | |
| Oil Pump Cover Bolt | 120 | I use blue thread-locker | |
| Oil Pump Mounting Bolt | 35 | ||
| Pulleys 5/16″ Bolt (pump and crank) | 200 | ||
| Rocker Arm Adjuster Jam Nut (aftermarket) | 25 | ||
| Spark Plug | See Note | 1/4 – 1/2 turn until feeling the gasket seat, which is about 30 lbft. I apply a very small dab of anitseize to the threads to help ease future removal. If doing so, ensure the antiseize does not contact the electrode surface. |
|
| Starter Motor Bolt or Stud into Aluminum | 216 | Apply antiseize to the stud to stop corrosion with the aluminum. | |
| Starter Motor Stud Nut | 25 | ||
| Thermostat Housing Bolt, Aluminum | 144 | Seal with Rectorseal 23631 T Plus 2 or equivalent if bosses go through into coolant. Apply antiseize if bosses are blind. |
|
| Thermostat Housing Bolt, Iron | 180 | Seal with Rectorseal 23631 T Plus 2 or equivalent. | |
| Timing Cover Bolt, Aluminum | 30 | Some bolts require Rectorseal 23631 T Plus 2 or equivalent since they go into coolant. Blind bosses should receive antiseize. See my technical article on installation including which bolts to seal. See timing cover and water pump installation tech article. | |
| Timing Cover Bolt, Iron | 35 | Some bolts require Rectorseal 23631 T Plus 2 or equivalent since they go into coolant. See my technical article on installation including which bolts to seal. See timing cover and water pump installation tech article. | |
| Torque Converter Plug 1/8″ NPT | 7 | Seal with PTFE tape or Rectorseal 23631 T Plus 2. | |
| Transmission Inspection/Dust Cover Bolt | 100 | ||
| Valve Cover Bolt | Tighten evenly until gasket seats. 20 max | WARNING: Overtightening can warp the cover and cause leaks. | |
| Water Pump Bolt | 35 | Some bolts require Rectorseal 23631 T Plus 2 or equivalent since they go into coolant. See my technical article on installation including which bolts to seal. See timing cover and water pump installation tech article. |
Figures