TorqueFlite 727 Transmission 19 to 24 Spline Conversion
Performance Upgrades
Introduction
There are multiple quality performance books available that discuss modifying TorequeFlite 727 and 904 transmission in depth, but I wanted to discuss and demonstrate a few performance modification in detail and to clear up some confusion about some of the processes that are not fully covered in books. I perform these modifications on most of my 727s including for the poly 390 stroker build. These upgrades include changing the input shaft from the early 19 splines to the later 24 splines since there are far more options for 24-spline torque converters. The upgrades also include oiling modifications to better support components and adding frictions and steels to the direct clutch drum to withstand higher torque and improve shifts.
19-spline Input Shaft to 24-spline Conversion
For those wanting to retain a push-button 727 behind a performance A-block, torque converter selection becomes an important issue. 1962 – 1965 push-button 727s and some 1966 lever-operated 727s used a 19-spline input shaft. In 1966, Chrysler Corporation made a running change and moved to 24-spline input shafts. While 19-spline higher stall converters used to be commonplace, almost all aftermarket manufacturers have abandoned them leaving a user with the option of purchasing a custom-built converter. The other option is to convert the transmission to 24 splines and use the plethora of converters on the market.
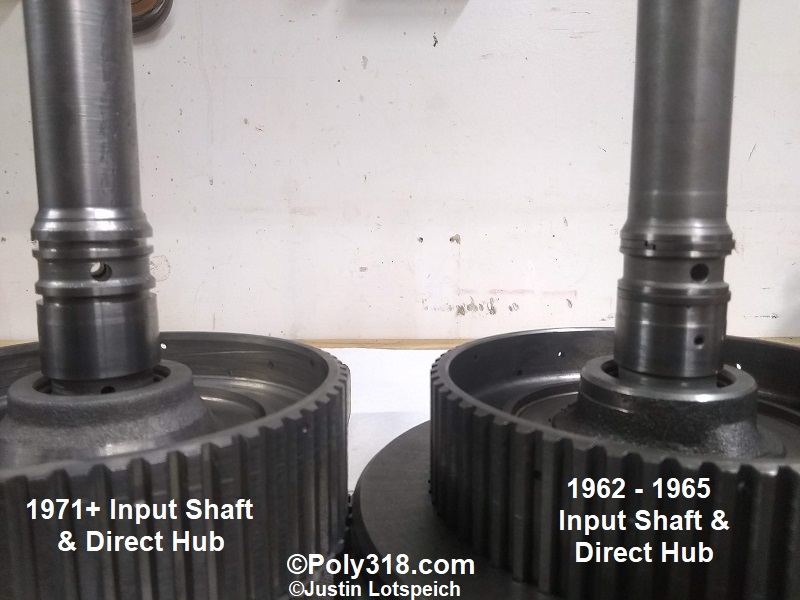
Importantly, you must use the input shaft, direct hub, direct drum, and reaction stator support all from the same year range below, and you cannot mix these four components between these year ranges.
- 1966 – 1970
- 1971+
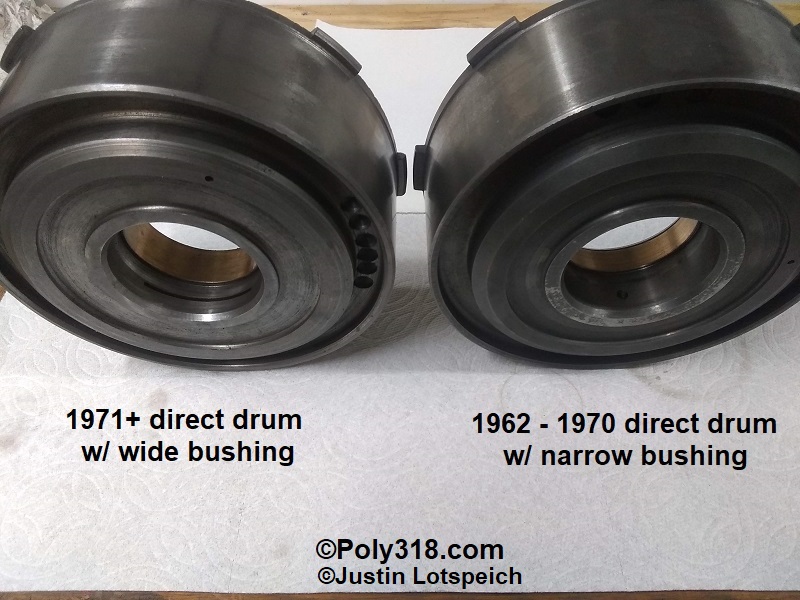
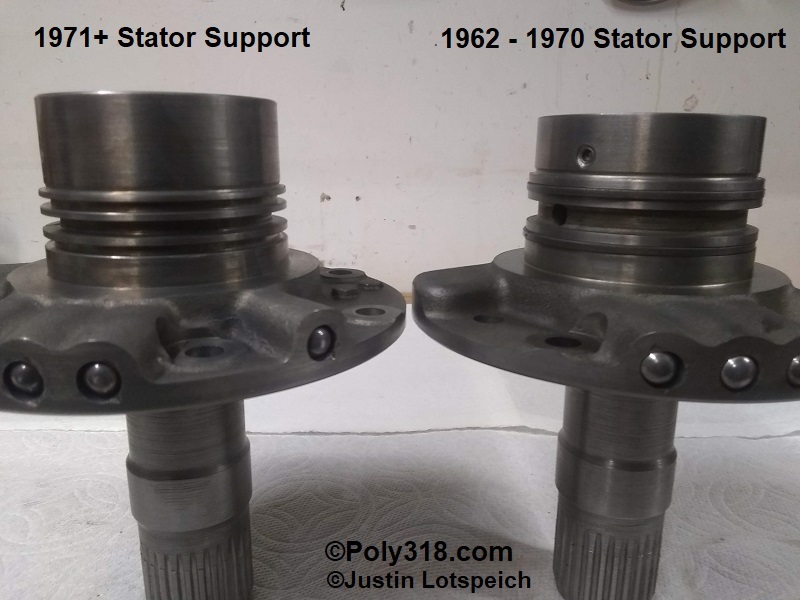
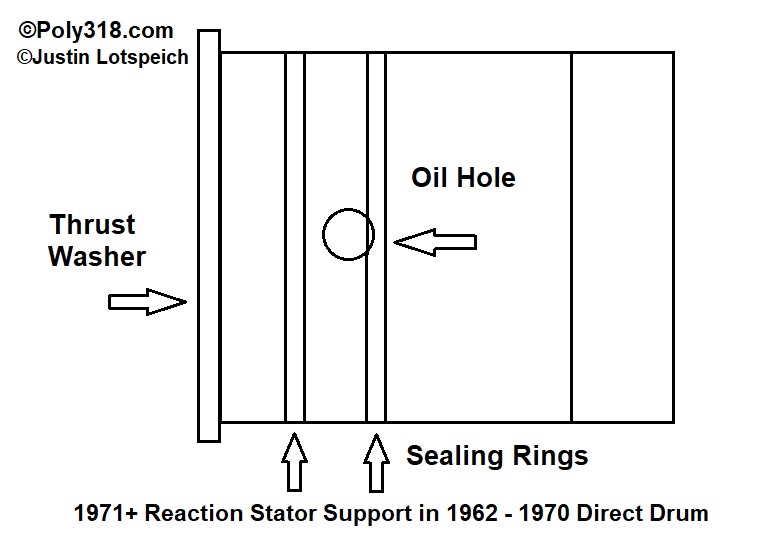
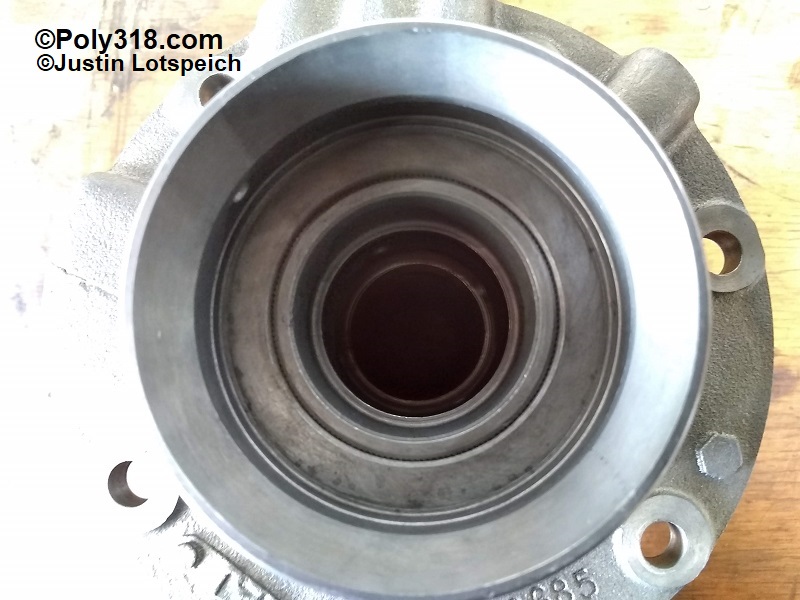
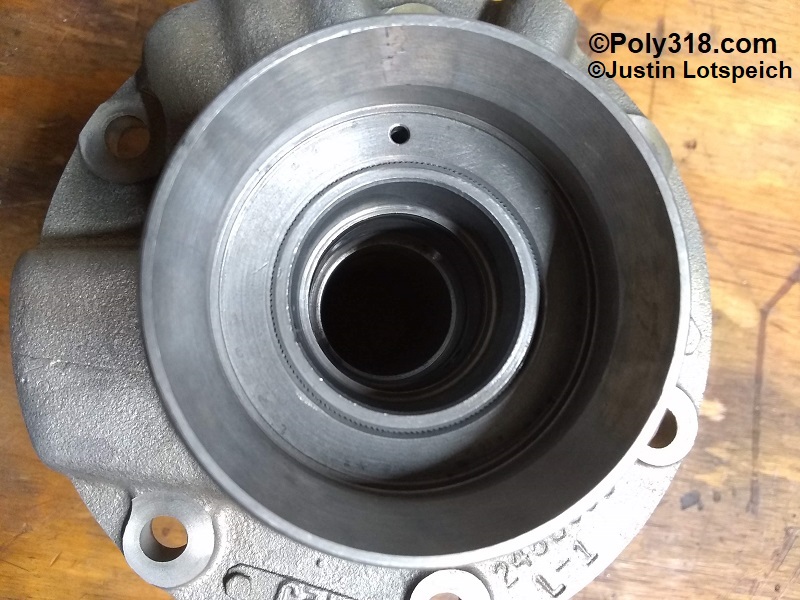
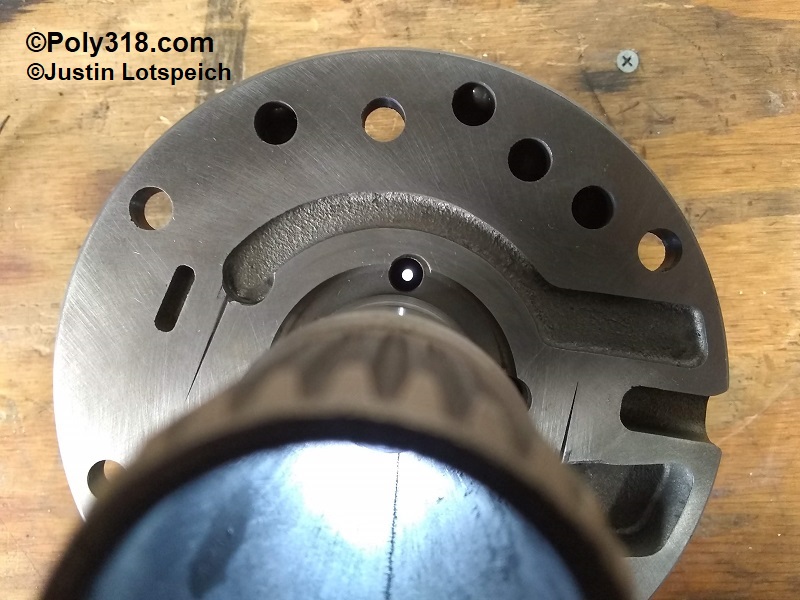
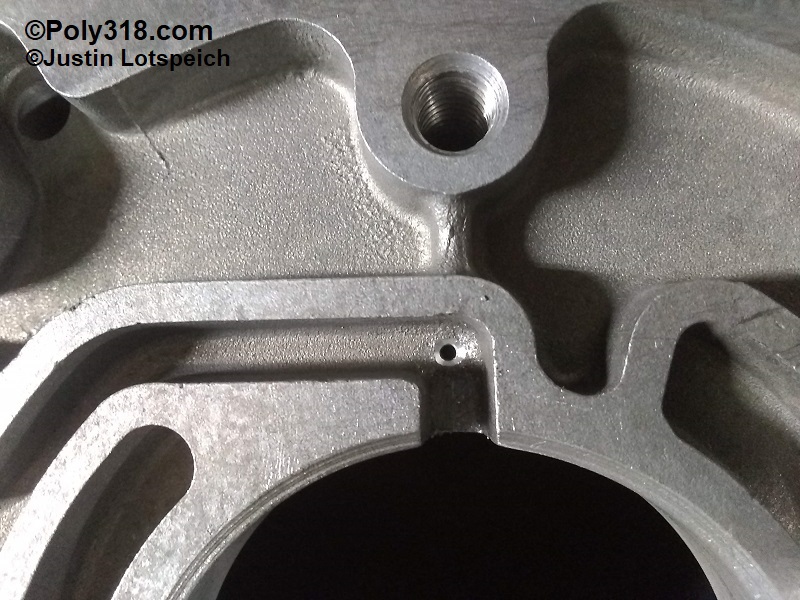
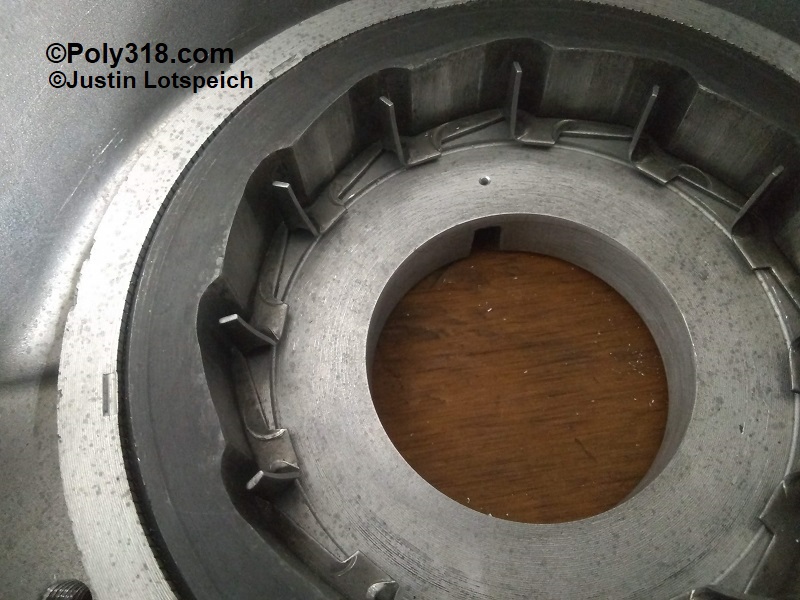
This year range stems from an important redesign of the components in 1971. 1967 – 1970 direct drums utilize the same narrow 9/16” direct drum stator support bushing as the 1962 – 1966 transmissions (Figures 1 and 2). In 1971, Mopar redesigned the components to use a wide 13/16” bushing and deeper stator support hub to utilize the wider bushing (Figures 1 and 2). The 1971+ setup is a superior upgrade since it reduces wobble when the clutches are applied and released. However, there is conflicting information online regarding whether the direct drum must also be swapped, which I clear up here. The difference in the drums is that 1962 – 1970 used two 1/4″ diameter oil holes sandwiched between iron sealing rings located on the stator support, whereas the 1971+ drum uses a thinner 1/8″ wide oil slot sandwiched between two iron sealing rings (Figure 3). Because the 1962 – 1970 bushing is narrower, the sealing rings on the matching stator support are spread out wider to clear the larger 1/4″ oil holes, whereas they are closer together on the 1971+ stator support since the bushing is wider and the oiling slot thinner. When I first began inspecting the different components and read that I would not need to use the 1971+ direct drum, I worried that the 1971+ sealing ring configuration would cut through one side of the oiling holes in the 1962 – 1970 drum and thus cause a leak. After closely measuring the component using a .084″ pump to drum thrust washer which is typical for a factory setup, I found that the sealing ring on the 1971+ stator support will encroach on the backside of the 1962-1970 drum oil holes by .030″, thus pushing pressurized oil up against the sealing edge of the ring while simultaneously decreasing the ring’s sealing thickness from .093″ to .053″ (Figure 4). This issue is exacerbated if the input shaft endplay requires a .102″ thrust washer, which is not uncommon, in which case the sealing ring encroaches on the oil hole .048″ cutting the ring sealing surface by more than half. In practice, the ring may still seal, but the risk is unnecessary since a 1971+ direct drum resolves the issue.
Stator Support Oiling
In 1971, Mopar redesigned the reaction stator support, and one of the changes was deleting the oil passage to oil the direct hub (Figure 5). It is a wise modification to drill this passage on both stock and performance A-block builds. Using a #42 bit in a drill press, I drilled through the stator support connecting the oil gallery and hub mounting surface. I then gently chamfered the hole by hand with a #40 bit and hit the surface with 320 emery cloth to remove any lip (Figures 6 and 7). Note that there is approximately 1” of cast iron to drill through using a very small bit, so use gentle pressure, plenty of cutting oil, and go slowly so as to not break the bit.
Overrun Sprag Race Oiling
The sprag race rides against the back of the aluminum case and from the factory depends on secondary oiling via the output-shaft support and splashing (Figure 8). Some cases survive just fine with this system, but I’ve come across cases galled by the race. To assist with keeping this area lubricated, you can drill a #42 hole through the case to tap into the oil gallery. 1962 – 1966 727s utilize a rear pump, whereas 1967+ do not have a rear pump; therefore, the oil gallery design in the case differs. For 1962 – 1966, drill a #42 hole 15/32” from the output shaft support hole in the case (Figures 9 and 10). For 1967+, drill a #42 hole 3/8” from the output shaft support hole. Chamfer both ends of the hole by hand with a #40 bit, and hit the case with 320 emery cloth to smooth any ridge. The backside of the race will now receive constant pressurized oil.
Direct Clutch Drum 3, 4, or 5 Friction Configurations
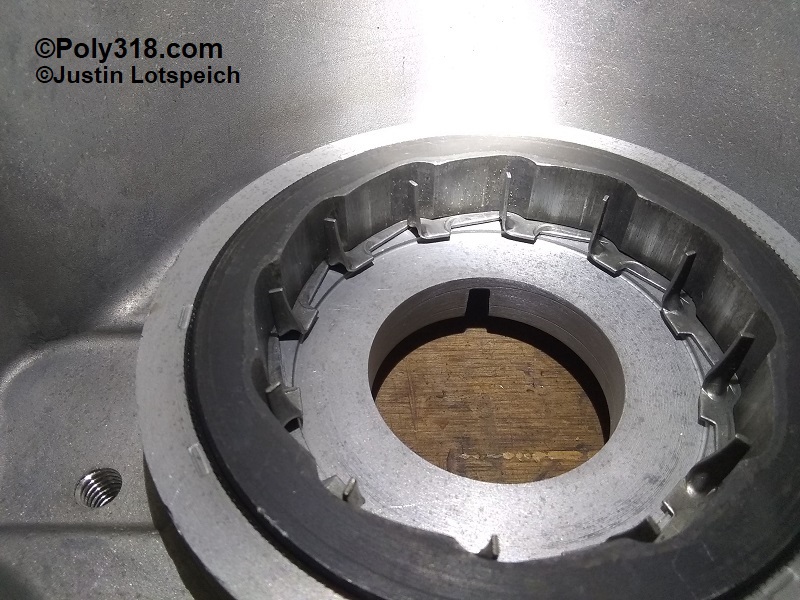
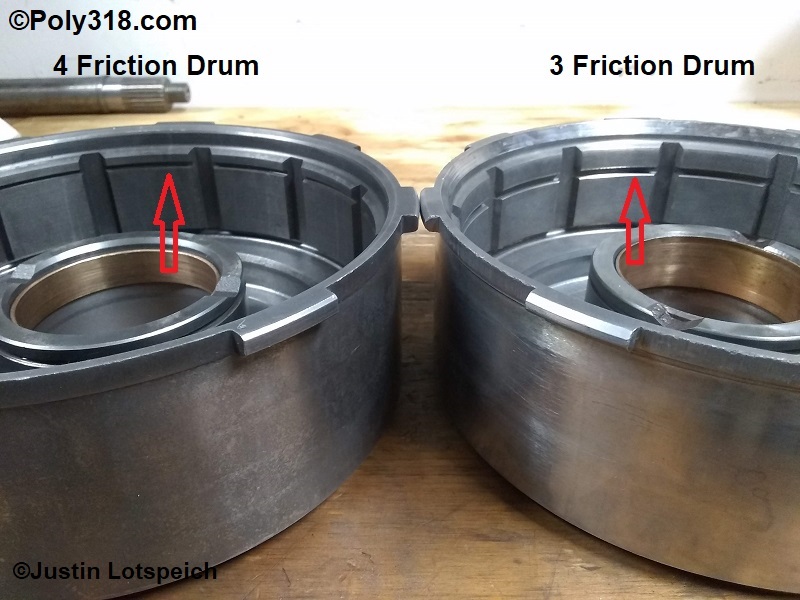
Depending on what application the transmission was originally used in, the direct drum can contain either three, four, or five frictions (Figure 11). Standard applications utilized three frictions, heavier duty four frictions, and Street Hemi and 440 Six-Packs a rare five frictions. For a stock poly A-block or LA that won’t see the track, three quality frictions such as Alto will do the job just fine. For performance engines or those that will see track time, it is wise to upgrade to four or five frictions. For engines that require five or even six frictions, you are in the territory of an aftermarket billet direct drum that will take five or six frictions anyway, so the following information is rather moot. Here are your options for converting from three to four or five frictions:
- Replace the three-friction drum with a factory four-friction drum. Remember to get a donor drum that matches the year range of your input shaft/direct hub/reaction stator support of 1966 – 1970 or 1971+ as I explain in the section above on input shafts.
- Use available “thin” frictions like the Alto Red line that allow you to cram four frictions into a 3-friction drum, five frictions into a 4-friction drum, or a whopping six frictions into a 5-friction drum.
- Have a machinist machine a new snap-ring groove in the inside of the drum to match a four- or five-friction drum. Then use either four or five standard frictions or thin Alto Red frictions.
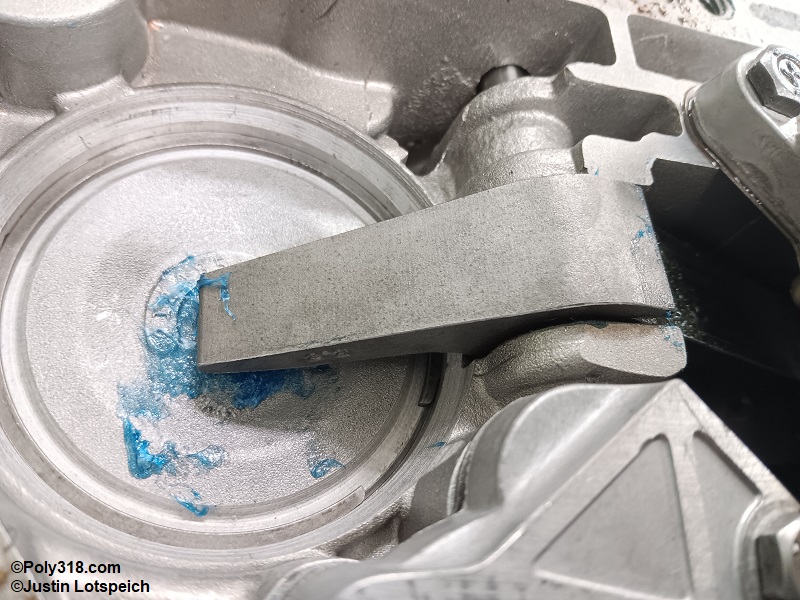
Front Band Apply Lever
The front band apply lever is another area worth modifying. The servo piston rod presses up on the lever which in turn tightens the band. Lever ratios include 2.5, 2.9, 3.2, 3.8, 4.2, and 5.0. The vast majority of small-block TorqueFlite 727s received a 2.9 lever, which apply the band slower and with less force and release the pressure quicker than numerically higher ratios. 727s behind factory high-performance 340s and 360s usually received a 3.2 lever. The vast majority of big-block TorqueFlite 727s received 3.2 or 3.8 ratio levers. Only 426 Hemi and 440 six-pack 727s received a 5.0 lever in conjunction with the wider front band since the wider band along with the high-torque engines required greater force to hold.
However, one should not simply assume that if a 5.0 lever was good for the Hemi it is good for any high-performance build. In fact, the transmission can suffer damaging issues when using a 5.0 or 4.2 lever because while the levers apply force quicker than a numerically lower lever, they release the pressure much slower. This slow release can cause first gear to remain engaged after shifting into second gear creating overlap that can do serious damage if not corrected. Transmissions using a 5.0 or 4.2 lever require additional modifications (e.g. wide front band, additional front clutch springs, etc.) and/or a manual-shift valve body to make use of the lever.
Most street and street/strip 727s under 850 ft.lbs. torque at the flywheel will work extremely well with a 3.8 lever since it actuates the band quicker and with greater force than a numerically lower ratio lever yet releases the band quick enough to avoid 1-2 shift overlap (Figure 12). The 3.8 lever accompanied by other performance modifications (e.g. shift kit, performance steels and frictions, etc.) will produce faster, firmer shifts compared to the same transmission with a 2.5, 2.9, or 3.2 lever. I use 3.8 levers in my builds without a full manual-shift valve body and have never had a need to go to a 4.2 or 5.0 lever. 3.8 levers are readily available aftermarket both in ductile cast iron and billet steel.
Figures